External Wall Insulation: Step-by-Step Guide. If you’re looking to improve your home’s thermal performance, lower your energy bills, and protect your property from moisture damage, external wall insulation (EWI) is one of the most effective solutions available in the UK.
This guide breaks down the EWI installation process step by step — from the initial property assessment to applying the final render. We’ll also cover typical installation timelines, the best materials to use, and the key benefits of choosing professional installers.
Whether you’re considering EWI for the first time or planning an upgrade to reduce energy bills, this guide will help you understand what’s involved and how to get the best results.
Content Page
- What Is External Wall Insulation and Why Is It Important?
- External Wall Insulation: Step-by-Step Guide
- How Long Does External Wall Insulation Take to Install?
- Choosing the Right Materials and Render Type
- Do You Need Planning Permission for External Wall Insulation Installation?
- Benefits of Professional Installation
What Is External Wall Insulation and Why Is It Important?
External Wall Insulation is the process of adding an insulating layer to a property’s external walls to help retain heat and keep out the cold. It’s one of the most effective ways to improve your home’s energy efficiency — especially if you live in an older building with solid walls that are more prone to heat loss.
By reducing heat loss, EWI helps lower your energy bills and keeps your home warmer in winter and cooler in summer. It also enhances the appearance of your property and protects the external walls from weather-related damage. When installed professionally, EWI can increase your home’s value and create a more comfortable indoor environment year-round.
Proper installation is key to getting the full benefits, which is why it’s important to work with a professional team that follows all the right steps and building regulations. Below, we walk you through exactly how the EWI process works, from start to finish.

External Wall Insulation: Step-by-Step Guide
Installing EWI involves several stages. Below is a breakdown of each step:
Step 1: Initial Assessment and Property Survey
A thorough survey is conducted to assess the property’s suitability for external wall insulation. This includes:
- Evaluating Wall Structure: Confirming if the walls are solid or cavity and identifying any existing issues such as dampness.
- Render Test: If the property has an existing render, a test is performed to ensure it’s strong enough to support the insulation. Weak or damaged render may need to be removed.
- Identifying Fixtures and Fittings: Noting external elements like satellite dishes, lighting, or pipework that may need to be removed or adjusted during EWI installation.
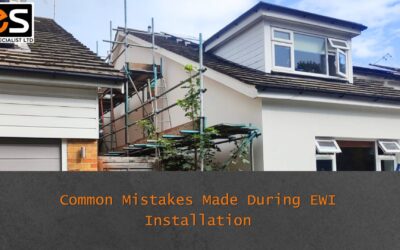
Step 2: Scaffolding Assembly
- To ensure safe and efficient access to all areas of the exterior walls being treated with EWI, scaffolding is securely installed before work begins.
Step 3: Preparation
Preparing the property involves:
- Removing or Adjusting Fixtures: External fixtures such as pipework, satellite dishes, and lighting are removed or adjusted. Temporary downpipes may be installed to manage water runoff during the installation.
- Protecting Windows and Doors: Protective film is applied to windows and doors to prevent damage and keep them clean throughout the installation process.

Step 4: Surface Preparation and Repair
Ensuring a solid foundation for the insulation:
- Installing Starter Tracks: A starter track (also known as a carrier tray) is fixed at the base of the wall, a few inches above ground level, to provide a level starting point for the insulation boards.
- Fixing Any Damage to the Walls: Any cracks or damages in the existing wall surface are repaired to ensure a smooth and stable base for insulation.
Step 5: Fixing the Insulation Boards
- Adhesive Application: A layer of adhesive is applied to each insulation board before fixing it to the wall in a staggered pattern.
- Cutting for Fit: Boards are cut to fit around windows, doors, and other house features.
- Sanding: Once installed, the surface of the insulation boards is rasped (sanded) to ensure a flat and even finish.
- Mechanical Fixings: In addition to adhesive, mechanical fixings (such as insulation anchors) are used to securely attach the boards to the wall.
Step 6: Adding Beading
- Installing Corner and Stop Beads: Beads are fitted around corners, windows, doors, and other openings to reinforce these areas and ensure a clean, sharp finish.
Step 7: Applying the Basecoat and Reinforcement Mesh
Creating a durable protective layer:
- First Basecoat Layer: A basecoat render is applied over the insulation boards.
- Embedding Reinforcement Mesh: A fibreglass mesh is embedded into the wet basecoat to add strength, prevent cracking and allow for natural building movements.
- Second Basecoat Layer: An additional layer of basecoat is applied over the mesh to fully encapsulate it, creating a robust and stable surface.
Step 8: Primer Application
Preparing for the final finish:
- Applying Primer: Once the basecoat has cured, a primer is applied to enhance the adhesion and longevity of the final render finish.
Step 9: Applying the Final Render Finish
- Final Render Application: The chosen finish (such as silicone, acrylic, or mineral render) is applied in the selected colour and texture, providing both a decorative finish and additional weather protection.
Step 10: Reinstalling External Fixtures
- Reattaching Fixtures: Previously removed fixtures like pipework, satellite dishes, and lighting are reinstalled. Extensions may be added to window sills to accommodate the added wall thickness.
Step 11: Final Inspection and Aftercare Advice
- Conducting a Thorough Inspection: The installation is reviewed to ensure all components meet quality standards.
- Providing Maintenance Guidance: Homeowners receive advice on maintaining the render finish and ensuring the longevity of the insulation system.

How Long Does External Wall Insulation Take to Install?
The average installation time for EWI is typically 7 to 14 working days for a standard semi-detached house in the UK. However, this timeline can vary based on several factors, including:
- The size and height of the property
- The condition of existing walls
- The complexity of architectural features (e.g. bay windows, extensions)
- Weather conditions, especially during colder or wetter months
- Any unexpected repair work required prior to installation
Larger or more complex properties may take up to 3 to 4 weeks, especially if additional scaffolding, bespoke detailing, or breathable systems are needed. Your EWI installer will provide a personalised time estimate during the initial property survey.

Choosing the Right Materials and Render Type
Selecting the correct insulation material is key to achieving optimal thermal performance and long-lasting results. The most commonly used insulation boards in the UK include:
- Expanded Polystyrene (EPS) – A cost-effective and widely used material with good thermal performance.
- Mineral Wool / Rockwool – Offers excellent fire resistance and sound insulation; ideal for breathable wall systems.
- Phenolic Foam (e.g. Kingspan K5) – A high-performance option with excellent insulation value in a slim profile.
- Warmshell Woodfibre Boards – A natural, breathable solution ideal for traditional solid wall buildings and eco-conscious projects.
Once the insulation is installed, the system is finished with a layer of render. Common render types include silicone, acrylic, mineral, or brick-effect render, each with unique properties for water resistance, breathability, and decorative appeal. Your installer can recommend the best combination of board and render for your home based on its structure, age, and environmental exposure.

Do You Need Planning Permission for External Wall Insulation Installation?
In most cases, you won’t need planning permission to install EWI. But if the work changes how your home looks—especially if it’s in a conservation area, a listed building, or an Area of Outstanding Natural Beauty—you might need approval.
To be safe, it’s always a good idea to check with your local planning authority before starting work.
Benefits of Professional Installation
Choosing professional installation for your EWI system offers several key advantages. First and foremost, it ensures full compliance with UK building regulations and industry standards, giving you confidence that the system has been installed safely, correctly, and to the highest standard.
Experienced insulation specialists can also recommend the most appropriate materials and techniques for your property’s specific needs, whether you’re aiming to improve energy efficiency, reduce heat loss, or address moisture concerns.
Additionally, reputable installers often offer a comprehensive workmanship warranty, giving you peace of mind and protecting your investment from potential issues or defects in the future.
For the best results, always choose a certified and trusted professional to install your External Wall Insulation system.

If you’re considering external wall insulation, our expert team is here to help. With years of hands-on experience and a proven track record, we offer tailored advice and deliver high-quality workmanship.
Take a look at our finished projects to see the results for yourself — and contact us today to discuss how we can improve your home’s energy efficiency, comfort, and appearance.